Plan a Flight
What to Expect
Enroute Flight Navigation offers essential flight planning functionality: you can display the route on the moving map and compute travel time and fuel consumption estimates. The following image shows the Flight Route Window in a typical situation.
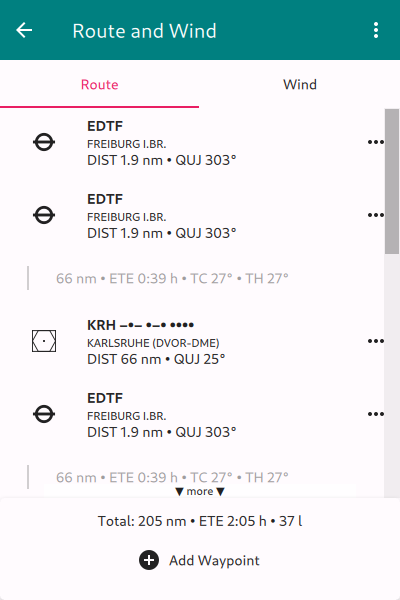
Flight Route Window, Route Set
As soon as you are flying and following the route, the moving map will show additional items that help you navigate.
The moving map shows the intended flight as a magenta line.
The map shows the path from the current position to the next waypoint as a thin red line.
An info box shows distance, ETE, and ETA for the flight to the next and the final waypoint.
The following image shows a typical situation.
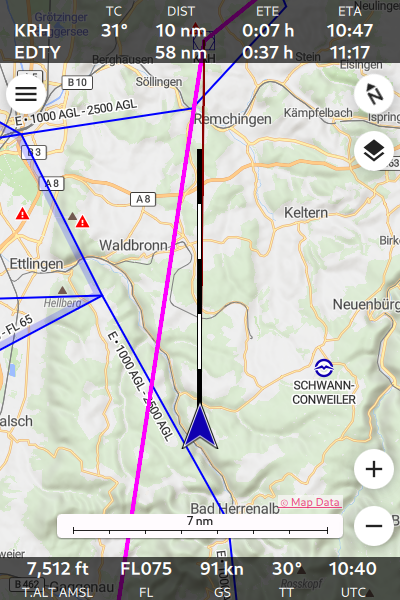
Moving Map When Following a Flight Route
Note
Enroute Flight Navigation shows the info box only when airborne, closer than three nautical miles to the intended route and further than three nautical miles from your destination.
Set Up a Route
This chapter will take you through the necessary steps to set up a route.
Step 1: Set Aircraft Characteristics
To compute travel time, Enroute Flight Navigation needs to know the cruise speed of your aircraft. If you have followed this manual, you have entered this piece of data after you downloaded the aviation map. If not, then please check the Section Set Aircraft Specifics again.
Step 2: Specify Wind
Enroute Flight Navigation also needs to know about the wind. If you are not on the page “Route and Wind,” open the main menu and choose the item “Route and Wind.” Select the tab “Wind” and enter an estimate for wind direction and speed that you expect to encounter during your flight.
Step 3: Specify Waypoints
Enroute Flight Navigation needs to know where you want to go. There are several ways to specify the waypoints in your route.
Enter waypoints by name
Select waypoints in the moving map
Load a route from the route library
Import a file from another program
Most users will enter the waypoints manually. Still, we explain all four methods in some detail.
Option 1: Enter Waypoints by Name
If you are not on the “Route and Wind” page, open the main menu and choose the item “Route and Wind.” On the page, select the “Route” tab. The page will initially look like this:
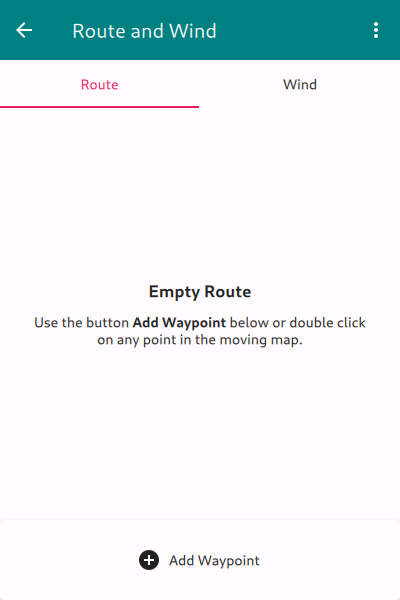
Flight Route Window, No Route Set
A tap on the field “Add Waypoint” at the bottom of the page will open a dialog window showing a long list with all waypoints from all aviation maps you have installed. Enter a few letters of the waypoint name (“Freiburg”) or ICAO code (“EDTF”) to narrow the list down. Once the desired waypoint becomes visible, a click will add it to the route.
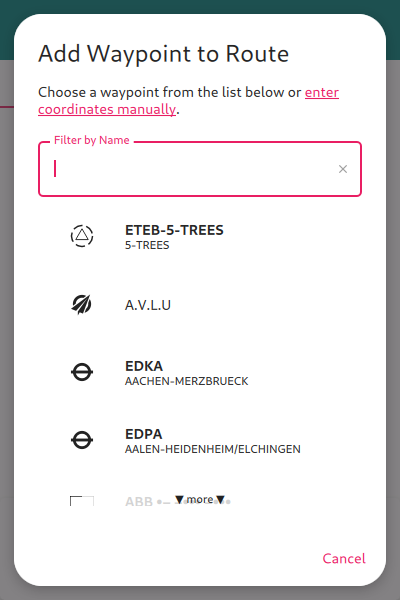
Enter Waypoints by Name
Click on the field “Add Waypoint” again to enter more waypoints.
Option 2: Select Waypoints in the Moving Map
It is possible to add waypoints directly from the moving map.
Double-tap or tap-and-hold on any point of the moving map. The waypoint description dialog will open.
Tap on the “Route” button to add the waypoint to the current route. A menu will open.
The waypoint can be added in several ways.
Tap on “Direct to” to discard the current route and to add the current position and the given waypoint to your path.
Tap on “Append” to append the waypoint to your route. The waypoint becomes the last point of your route.
Tap on “Insert” to insert the waypoint into your route. Depending on the geographical position, the waypoint becomes the first point of your route, the last point of your route, or it will be inserted into the middle of the route. This function is particularly useful to add a detour while in flight (for instance, to avoid an active parachute jumping exercise area).
If the waypoint is already present in your route, you can tap on “Remove” to remove the waypoint from the route.
Option 3: Load a Route From the Library
Section Save route for future use will show how to save a route to the library for future use. If you have already saved a route to the library, go to the open the main menu and choose the item “Library/Routes.” The route library page will open. Choose a route by tapping on the respective item in the list.
Option 4: Import a File From Another Program
To prepare your flight, you might want to use full-featured flight preparation software or online services. The Section Flight Planning Tools highlights a few tools typically used in our club.
All programs known to us are able to export flight routes in GPX format, which is one of the formats that can be read by Enroute Flight Navigation. A full list of supported file formats is found in the Section Supported File Formats.
The Section Import Data explains the import process in detail.
Step 4: Edit the Route if Necessary
It might be necessary to edit the route. If you are not on the “Route and Wind” page, open the main menu and choose the item “Route and Wind.” On the page, select the “Route” tab.
Global Functions
The three-dot-menu in the upper right corner of the screen allows reversing the route or deleting it entirely.
Waypoint-Specific Functions
The three-dot-menu to the right of each waypoint allows one to delete a specific waypoint or move it up and down in the list. You can edit waypoints that do not refer to pre-set airfields, navaids, or reporting points. Tap on the pencil symbol to open a dialog that allows you to set a name and edit the coordinates.
Save Route for Future Use
Once you are happy with the route, you might want to save it for future use. If you are not on the “Route and Wind” page, open the main menu and choose the item “Route and Wind.” On the page, select the “Route” tab. The three-dot-menu in the upper right corner of the screen allows saving the route to the library.